
Sender Policy Framework - SPF Guide
Technical Guide
Original Release Date: 8/26/2022

What is Sender Policy Framework?
Sender Policy Framework (SPF) is an email authentication protocol that enables solely authorized mail servers to send emails for a specific domain while rejecting those sent from an unauthorized server. When an email is inbound, the mail server checks to ensure the domain is from an authorized IP address.
Why is SPF Important?
SPF records, when implemented with a DMARC policy of quarantine or reject, can prevent email spoofing. On their own, SPF records can prevent an unauthorized sending host from sending messages for the envelop sender's domain.
Should You Use SPF?
Any business or company sending commercial or transactional emails should implement SPF records. Without an SPF record, attackers can spoof your domain name for email phishing attacks; this can lead to ransomware, malware, and financial loss or fraud.
How Does SPF Work?
First, a domain administrator creates and publishes an SPF record, defining the mail servers allowed to send email from that domain. Next, the inbound mail server receives an incoming email.
The mail server verifies the sender's IP address with the list of authorized IPs previously defined in the SPF record. The mail server receiving the emails then decides if the email should be accepted, rejected, or flagged based on the rules previously defined in the SPF record.
Creating an SPF Record
Step 1: Gather Your Data
- Identify the mail servers that are tasked with sending your organization's emails.
- Document all your organization's IP addresses used for email that will be specified as authorized in the SPF record.
- Document all your organization's domain(s) that will be used to send email.
Step 2: Access the DNS Control Panel
- Access your organization's DNS Control Panel through your Internet Service Provider (ISP).
- Select the domain you want to create the SPF record for.
- Click the DNS button (see image below).

Step 3: Create SPF Record
- You may have to select add if this is a new SPF record. Otherwise, edit the existing SPF record.
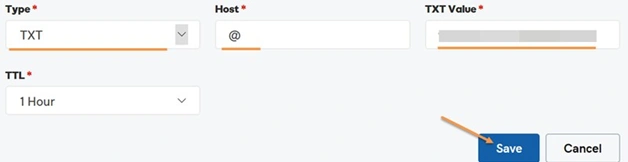
- Set the type of record to TXT.
- Set the hostname field to the name of your domain. The SPF record should be entered for the TXT Value.
- Set the Time To Live (TTL) as the default, or to 3600 seconds, which is the recommended time frame for TXT records.
To create the SPF TXT value:
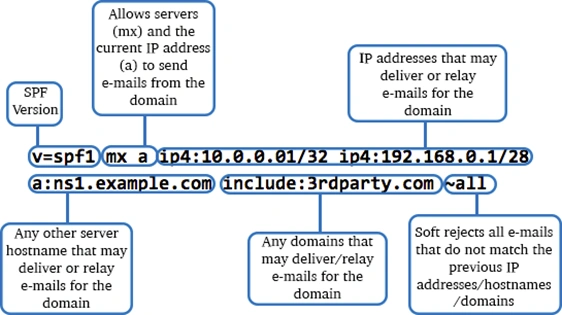
- Begin with "v=spf1", which sets the SPF version to version 1.
- Another option is to add "a" and "mx" after the beginning of the SPF statement.
- The "mx" option lists all acceptable server IP addresses for the domain.
- The "a" option is one of the several mechanisms that dictate what IP addresses are allowed to send mail from the domain.
- v=spf1 mx a -all
- In the example above, the "mx" stores one IP address for checking and "a" stores another. The "-all" then dictates that all emails that do not match "mx" or "a" are not valid emails.
- There are lists online with all the different options available to use in an SPF record.
- If you have a list of IP addresses you documented in Step 1, insert those using the following syntax.
- v=spf1 ip4:1.2.3.4 ip4:5.6.7.8
- If you use a third-party service to send emails on behalf of your domains, you must add "include" after each statement in your SPF record. This makes the third-party service a legitimate sender.
- v=spf1 include:_spf.protection.outlook.com
- Once you have added all required information, end your record with an "~all" or "-all".
- the "-all" means all unspecified servers are not authorized (emails will be rejected).
- the "~all" means all unspecified servers are not authorized, but emails will be marked and accepted.
- v=spf1 include:_spf.google.com -all
Step 4: Validate
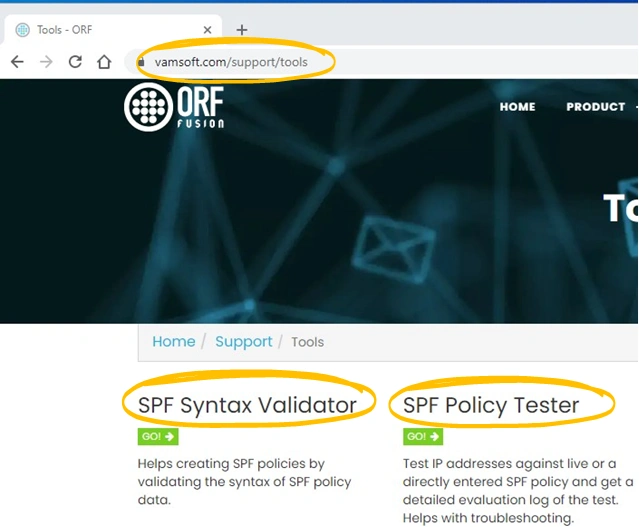
- Before the record is published, it is important to validate the SPF syntax and policy. Listed below is an example of a website that will validate the SPF record to ensure proper functionality once published.
- Please navigate to vamsoft.com/support/tools/ for more details.
Glossary
Domain - A domain is a structure for organizing, delivering, and accessing services on the internet. For example, "cyber.nj.gov."
Email Spoofing - Email spoofing is the act of modifying email sender information in order to appear as a known or trusted entity of the recipient.
Protocols - Protocols are plans, rules, actions, and measures used to ensure company protection against an attack, breach, or any other incident.
Time To Live - TTL is a DNS setting that tells the DNS resolver how long to cache a query before requesting a new one. The information gathered is then stored in the computer's cache until it reaches back out and collects new, update results. Therefore, it is important to set the correct Time To Live so that any information on the website or domain will update. For TXT records, in our case, the recommended Time To Live is 3600 seconds. Records within this timeframe use a low TTL focus to make fast changes but still can utilize some level of caching to help reduce resource consumption.
Resources
Below are more resources that may be helpful when creating your SPF record:
Add an SPF record | Domains - GoDaddy Help US
Edit an SPF record | Domains - GoDaddy Help US
How to set up an SPF record? (part 1) - YouTube
What is SPF and How to Setup SPF Record | Mailtrap Blog
The NJCCIC is a component organization within the New Jersey Office of Homeland Security and Preparedness. We are the State's one-stop-shop for cyber threat analysis, incident reporting, and information sharing and are committed to making New Jersey more resilient to cyber threats by spreading awareness and promoting the adoption of best practices.


View our Privacy Policy here.
View our Site Index here.